![]()
|
|
|||||
| Home | Tech | Features | Projects | News | Feedback |
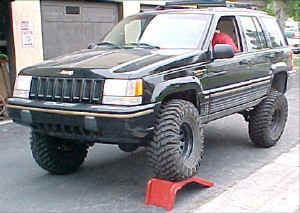 |
Rubicon
Express' 4.5" Lift and Leather Seats? By Bill Cooke |
Most people look at a Grand Cherokee and don't give it a second thought. We aren't most people! We decided to take this '94 ZJ Limited in a direction most people have never thought of, the top! The foundation for this ultimate transformation had to be the biggest and badest lift ever made for this Jeep. That meant a call to Rubicon Express was the first step. |
![]()
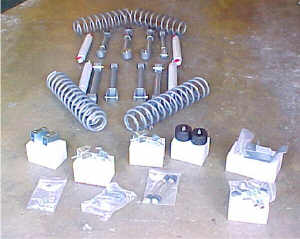 |
The Rubicon Express Suspension comes in three boxes. It's about the most complete lift I've ever seen with hand tools being the only extra thing you'll need to finish the install. What you'll want to make sure you have on hand are; a full set of metric tools (13MM, 15MM, 18MM and 21MM mostly), T50 and T55 Torx sockets, tall jackstands, a set of outside spring compressors and a 5/16" and 5/8" drill bit w/drill motor. We rented the spring compressor for free from Autozone ($50 security deposit). You'll also want to have a good fiend that doesn't mind spending the next couple of days hearing your bad jokes while you finish up the lift. There are just too many things you need two people for that trying to do this alone would be murder! Get help and you'll be very happy. |
![]()
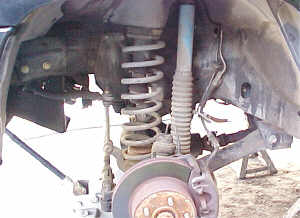 |
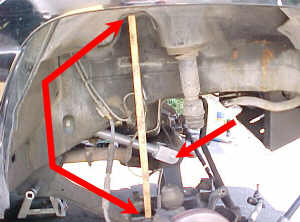
This is what you get with a Grand Cherokee with around 100K miles on it. This had the Up Country suspension, but that isn't going to cut it on the trails this thing is headed for. Cleaning everything up is a great idea and that's what we did for the first hour. After that it's time to remove the shocks, swaybar, spring clamps and install the new brake lines. You'll also have to remove the draglink from the pitman arm and unhook the trackbar. This allows the axle to droop enough to make working on it a breeze. Well, easier at least. |
![]()
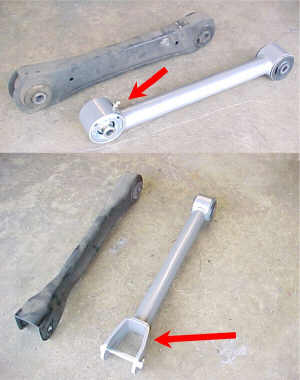 |
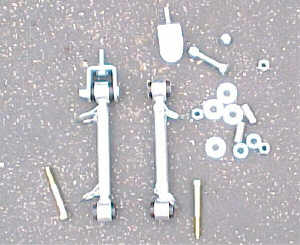
Here are the new arms that come with the
suspension lift. As you can see, compared to the stockers they are plenty
beefy and design to allow a lot of extra flex. The stock arms hit the
lower shock mount with even the slightest down travel. The upper arrow shows
how Rubicon Express moved the bar to the bottom of the arm to allow for
gobs more travel. This thing is so well engineered it isn't even funny!
The upper arms (lower ones in the picture) have a much stouter axle
mount that should hold up well. Both arms are also longer than stock to
assure proper wheel placement in the wheel wells. The flex joints go on
the axle side of the arms and allow the axle to twist without resistance.
We found that it's best to install one arm at a time when working from the garage floor. The other thing you'll need to think about is the direction of the grease fittings. We made sure to get them both pointed to the inside of the truck so we can easily reach them without having to move around a lot. It's the little things that add up to a quality install. |
![]()
 |
Here's the big trick we figured out. As soon as you go to install your first arm (uppers) you're going to notice it doesn't want to line up right (right arrow). You have to rotate the axle housing to get the bolts to go in. Take a stick (big arrows) and place it where to shock goes. Then you can jack up the axle to get it all lined up. Because the stick is so far from the centerline of the axle it let's you rotate the upper control arm mount to line up the bolts. This even works on the lower but you have to move the jack a little. The other side won't be as hard as you'll already have the axle set where it wants to go. |
![]()
 |
Here's a before and after to show you how much travel the new suspension allows. The upper shot is of the new arms installed and the brake rotor is on the ground. The lower pic shows the other side of the truck with the stock arms still in place. The rotor is over a foot off the ground! The truck is level and no tricks were used here. This is also a great time to check tire clearance. With the springs removed you can slap your new tires on there and cycle the suspension to see what clears and what hits. We found a few spots that hit with our 33" test tires so we did a bit of cutting and trimming to make them fit. We'll go into that more later. |
![]()
| You have to drill the lower spring pads for the new bumpstop spacers before you install the springs. Do this after you install the new arms as the extra clearance is needed to get the drill around the upper bumpstops. You'll need your 5/16" bit here. Don't hog out the holes as that will cause them to strip later. |
![]()
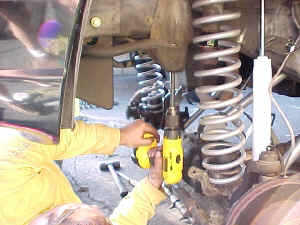 |
Use the spring compressors to install the
new massive coil springs and install you bumpstops. You can then install
the new shocks.
Next, you'll have to drill out the old trackbar hole on the frame to 5/8" to accept the new track bar. It has a Heim joint at the upper end and uses a regular bolt, not the tapered tie-rod type end like the stock trackbar. Once that's done, install the new trackbar and reattach the steering linkage. You'll have to adjust both before you drive the trucks but get the rear done first and then take care of all those things together. |
![]()
 |
The last thing to do is assemble the new
swaybar hardware. This suspension comes with Rubicon Express' Double
Disconnect swaybar links that allow for even more suspension travel
off-road. The great thing about this kit is the instructions that came
with it. They are fairly clear and complete. Every time we had a
question the answer was always there.
With the front done (9 hours later) it was time to get started on the rear. Click here for page 2 of the Rubicon Express 4.5" SuperFlex ZJ Suspension Installation |