|
|
|||||
| Home | Tech | Features | Projects | News | Feedback |
 |
Torture
Testing the By Bill Cooke |
|
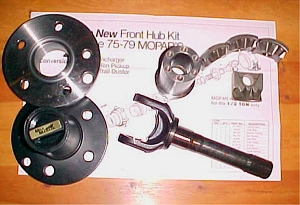
| If you own a Dodge full-time 4wd truck then you already know why this product was developed. We did an article a while back about how to change the wheel bearings. That was for those or you still running the stock parts. What do you do if you want to convert your truck over to part-time 4wd? There are a few options. Most involve scrounging around a junkyard looking for used parts. That's always fun and you never know just how "used" they really are until you go to install them. Another option is to use the MileMarker full-time conversion kit. It replaces your stock front hub but reuses many of the rest of the parts up front. That makes it easier to install and maintain because much of your parts are stock. The only drawback is that it still relies on the stock wheel bearings that aren't that strong. Tires any bigger that 31's will wear these bearings very, very fast and hard driving isn't much better for them. While there are plenty of people that run 33's on the stock parts they are cutting the life of these bearings in half. Try 35's and I hope you are good at replacing them on the side of the road! We were getting less than a 1,000 miles out of a set with 35's bolted to them. This has nothing to do with the MileMarker parts. It's those stupid bearings. |
![]()
 |
The kit comes with most of the parts you will need to do this conversion. What it doesn't come with is bearings, U-Joints and brakes. We also found the need for longer wheel studs to fit our Mickey Thompson Classic II wheels. You might want to get new grease seals too. We had to change ours almost immediately. All in all you're looking at about an additional $350 or so if you go with all new parts around the MileMarker kit. This is on top of the over $400 price tag of the kit we got quoted locally. It's pricey but it's the only option that gives you part-time 4wd and still uses the same 5 x 4 1/2" lug pattern so you don't have to buy new wheels too. |
![]()
 |
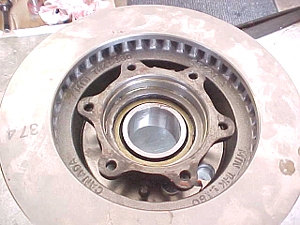
The first thing you must do is check your bearing preload. This MUST be correct for there to be any kind of bearing life at all. Simply slide the races and center spacer in the knuckle bore and tighten the retainer down. Make sure everything is nice and clean so that you get an accurate reading. Now use a feeler gauge to measure for .006" clearance behind the retainer. If you skip this step the first time don't worry, you'll be back doing it all over again very, very soon. |
![]()
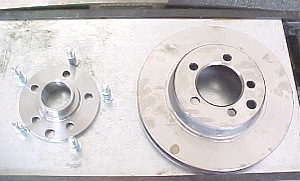 |
The next step is to assemble the rotor to the hub plate. This is done by driving the studs through the rotor and plate to sandwich them together. This can be done with a hammer and a drift but you need a press to get the bearings on so you might as well have them do this for you too. Your machine shop guy is going to love you with this job. |
![]()
 |
Here's where you'll find out just how nice your machine shop guy really is. You need to take the hub rotor/plates back from him and slide the retainers or the small stub on the back side. Then he can press the bearing shaft into place. They just love having people they don't know working on stuff in their shops. Offer to pay a little extra or bring him a 6-pack for the added nuisance factor. That should help. |
![]()
 |
With the retainer in place and the bearing on the shaft correctly (races towards the center, don't forget the spacer) it's time to press the whole thing together. Please don't use a hammer, you'll kill the parts in a heartbeat. Make sure it's all the way down and don't smash the grease seal in the retainer. It should stay up in place while you do the pressing but make sure it doesn't fall and get caught. That would be bad! |
![]()
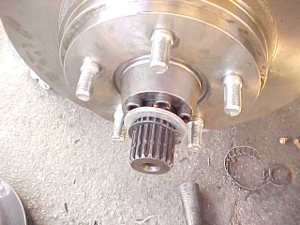 |
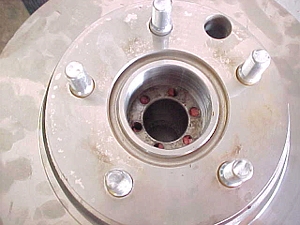
With all the pressing work done you can
head back and get to work on assembling the new hubs. You will need to put
the new outer axle shafts on the old inners, might be a good job for the
press but you can do this yourself if you want. Slide them on it, put in
the inner grease seal into the knuckle bore. Smear a little Ultra Black
RTV around the retainer then slide the complete rotor/hub/bearings into
the bore. Tighten the 6 3/8" 12 point head bolts down.
You'll then be able to stick a screwdriver into the vents in the rotor and
install the outer bearing retainer (cone shaped metal block with 6 holes
in it) and the allen bolts that hold them in place. Install the spacer and snap ring
seen in the photo. After greasing the wheel
bearings as you always have (you have been greasing your wheel bearings,
right?) you can slide the locking hub on and install the tires. That's all
there is to it. It's not too hard if you know what you're doing. If you
have ever changed the wheel bearings on this truck then you should be able
to handle this.
The transfer case parts is another story. Find a good shop to do that part of the job for you unless you are a master mechanic and can rebuild a manual trans in your sleep. Setting up the end-play and getting it all back in correctly is a bit of a trick. We included the pics for you just in case you feel the need. |
![]()
|
After driving the truck on 35's we were sad to see that our bearings didn't live much longer than a tank of gas. They are expensive and it gets old fast having to replace them all the time. To help yours live longer than ours make sure you have good ball-joints, tie-rod ends and a drag link (which we did) on the truck. Then don't run anything bigger than a 33" tire. Also, don't even think about derbyin' the truck with these crappy bearings. That's just asking for it. The good news is that our gas mileage went up a little. That's good news considering what gas prices have been doing for the past year or so. If you are going to convert to part-time just for the mileage don't. It will take a hundred years to payback the cost of the parts. If you want part-time to save wear and tear on parts, maybe not such a great choice there either. What, a couple of U-Joints and the diff bearings? Big deal, those don't wear out that fast anyways. If you want part-time so you can install a Detroit Locker in the front axle then you've got a screw loose. These little axles and bearing won't take that for long and you'll be looking for stronger parts before too long. So why should you install this kit? There are any number of reasons but it all comes down to personal choice. If you want to do, go for it. There's nothing wrong with the kit, it's the bearings that will let you down. |
| Contact Info:
MileMarker 1450 S.W. 13th Court |
Click here for part 2 of the MileMarker part-time conversion article |